Thursday, April 24, 2014

Miles and Miles in the Ditch

I began quilting on the green wedding quilt yesterday by working on the straight line stitching along each side of the white sashing. And I finished all the straight line stitching today!  I feel as though I've stitched about 27.5 miles of ditch!  

Then I moved on to the intricate, free motion pattern I chose for each of the colored squares and got 3 done before I had to come upstairs and get dinner started.  Only 51 left to go along with the half blocks along the sides.  (Groan) I bought a stencil and am using my Pounce and so far, I'm satisfied with this technique.


In the white sashing, I plan on doing a free hand vine and leaf design with a flower in each intersection. The first border will be a Celtic knot design and the diamonds in the second border will have a curved design in each one with something along the white sides of that border--maybe a line of circles to look like pearls.  I haven't decided what to do in the last border but I'm thinking of a feather pattern.

I need to have this quilt finished and delivered in the next 2 weeks.  Anyone want to make bets on that? Since it's raining out, I'm going to lie down on the couch and try to recover from my stitch in the ditch marathon.  

Sunday, April 20, 2014

Easter Sunday with my Peeps

I hope that you all have had a marvelous Easter day. with nice weather, a few flowers (or buds) in the garden, family and/or friends, great food and most of all, serenity knowing that however you celebrate this Spring holiday is the "right" way.

This is the first holiday we've celebrated in our new home. We did the traditional things with the usual suspects family members but in a new setting. It's been an awesome day!

For Easter dinner, I made what my kids have always called "Good Lasagna" ( as compared to "Everyday Lasagna"!)  Forgive me, Easter traditionalists, that I don't do the usual baked ham, etc. but we've had lasagna for Easter for over 20 years now.  I use the recipe in the Better Homes and Gardens cookbook that I received as a wedding shower gift in 1971. Every layer is made from scratch and it takes over 2 hours to prepare, assemble and bake, but it is sooo worth it!  I only make it for Easter and when someone requests it for a special celebration.  

After our Easter lunch was finished, we got ready for the Second Annual Peeps Olympics!  Daughter Tessa started this last year and it was so much fun that we repeated it again this year.   Last fall, we were at the Mall of America in MN and visited the Peeps store there. We got this giant stuffed Peeps bean bag to be the traveling trophy. Her she is sitting on her nest of Cadbury chocolate eggs (one of my personal favorite Easter candies, the other favorite one being the Lifesaver fruit-flavored jelly beans. Don't tell anyone but I have an extra bag stashed away for the future LOL), surrounded by all the participating Olympic teams.  As you can see, I am the yellow team--Nana.  Bear with me as I show you pix of the Olympic events and the overall champion of the day and winner of the traveling trophy.  


The first event is the sprint. You have to blow your Peeps the length of the dining room table and here daughter Jo, also known as Auntie Jo, competes with granddaughter Lily.  Lily won that round.


Next came the Peep-apult.  We had to catapult our peeps off a wooden spoon into the pot on the floor. We each had 3 tries and needless to say, none of us got a Peep into the pot.  So we decided that whoever was closest to the pot was the winner of that event.


The third event was the swimming race.  We had to blow our peeps across a large basin of water and whoever came in first was the winner. I was so excited watching the races and cheering on the Peeps that I forgot to take any pictures!

Now we have Peep Jousting.  Here you see two competing Peeps with their toothpicks jousting sticks on the plate, waiting to go into the microwave.

Before the microwave

After the microwave

 We set the microwave to no more than 30 seconds--no one was brave enough to see what would happen if we zapped them longer--no one wanted to have to clean up the mess if they exploded in there.  : p)

We also turned off the turntable so the Peeps couldn't move while they were in the oven.


As they were zapped, they began puffing up to enormous size!  I've never seen anything like it! The winner is the one whose jousting stick touches the other Peep first. The "after" pix gives you an idea how huge these things can get.


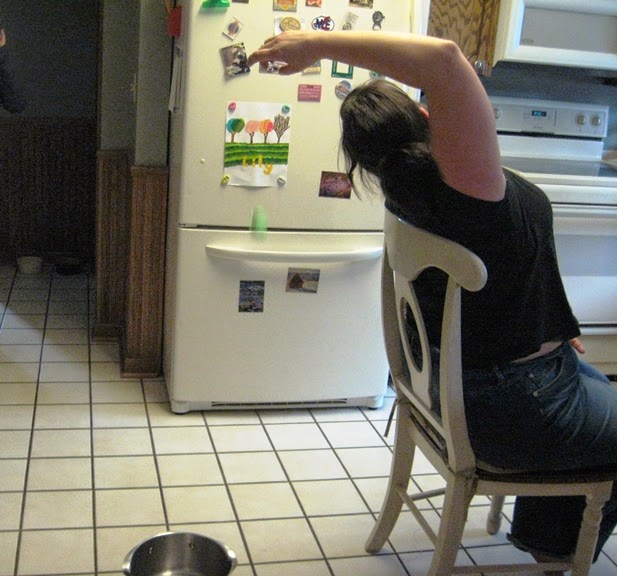
Each person got a score for each event and then we added up the scores to get the "grand Champion."  Tessa and I were tied for first place so we had to do an additional event that we called "Peep in the Pot."  Here Tessa is trying to get her green Peep in the pot behind her but she missed. I didn't miss so I'm the Grand Champion!


And here I am with my traveling Peeps trophy!  And I see that Don is "peeping" around the corner.  Could he be a little jealous over my amazing victory? ? ? 


And, lastly,  I have to include a picture of the Peeps cheerleaders in a Peeps pyramid!


As if that wasn't enough excitement for this beautiful, sunny, warm day, we went for a 1.6 mile walk on the local trail. It was very refreshing and helped work off some of the thousands of lasagne calories I consumed at lunch!

All the Peeps shenanigans sound so silly but they're good fun and the entire family had a great time! And isn't that what holidays are for--to celebrate our families. I hope your day was as much fun as mine was. Tomorrow, I quilt.


Thursday, April 3, 2014

Trimming and binding

Last May I was fortunate enough, along with my friend, to attend a workshop given by Bonnie Hunter in Ottawa IL. She was a wonderful teacher-- relaxed and unpretentious ( I wanted to take her home with me to be my newest BFF!)--and we began making Jared Takes a Wife.  I finished the top shortly after returning home to WI, and then it joined all the other finished tops on the shelf, patiently waiting to be quilted up.  Last Fall, I managed to sandwich it and get it pinned and then it sat again while we moved house and traveled through the winter.

When I got the top finished for the green wedding quilt for my friend, I realized that I didn't have any pins left to pin baste the quilt sandwich so I had 3 choices:  I could take the pins out and have to repin it again at a later date, I could do the machine quilting and thus free up the pins, or I could go out an buy a new supply of pins.  Never one to do things the easy way, I chose to do the quilting.  I now have it all finished but for the border and binding, and here it is:

I used all sorts of scraps helter skelter in this quilt and it is very chaotic and wild, in my opinion. Of course, when you look at it close up, it's even more wild than in the picture of the entire quilt.


Here's a close up of one of the blocks.  I think the apple green really sets it off and I plan on keeping this on a bed during the summer time. Not that we need a quilt here in humid WI in the summer, but it just looks like summer to me.

I'm not showing the quilting on this one because I'm not happy with it at all. I just wanted to get this done and one day, I'll begin picking out the quilting, block by block, and replacing it with something better.

So, my plan is to finish the border quilting today and then get the binding stitched on so I can do the hand sewing this evening.  Before I do the binding, I decided to check on the Internet about how to trim up the quilt for the binding.  One of the bloggers I follow mentioned once that she had trouble with trimming the quilt after the binding was machine stitched on. What?  I'd never heard of that--I'd been taught to square up and trim the quilt before stitching on the binding.  So, what's the "correct" way to do this?  Keep in mind, that I do mainly bed-sized quilts so maybe on smaller quilts one trims after stitching, I don't know.

I did find this great video of how to square up and trim the quilt before stitching on the binding and I thought I'd share it with anyone who's curious as I was.  http://www.overallquilter.com/blog/video-4-squaring-up-your-quilt/.  After watching this, I think I'll continue to trim up before I stitch on the binding.

The other thing the blogger mentioned was blocking the quilt. Again, I'd never heard of that, and I learned on another website that quilts meant to be wall hangings should be blocked--that is, wetted, laid flat and maneuvered into the shape and dimensions desired, then left to dry.  The website said that bed quilts which are at least occasionally washed don't need to be blocked. Whew!  That's good news for me!  I can't imagine wetting and pushing/pulling a queen or king sized quilt into shape and leaving it to dry on my floor, only to have to do it again every time I wash it!

So, how do you trim your quilts?  Before or after?  And do you block your quilts?  I'm curious to know.